NOTE: This user guide is specific to Programmatic+ campaigns. For information on individual Programmatic postings purchased in the marketplace, see: Programmatic Dashboard (single postings) User Guide.

In This Guide...
- What is Programmatic+?
- Programmatic+ Video Walkthrough
- Accessing the Programmatic+ Dashboard
- How to Use Programmatic+
What is Programmatic+?
JobTarget Programmatic is an algorithm-based product that helps by automating your advertising and using performance data to drive your jobs to the best-performing sites.
Programmatic+ is a monthly Programmatic campaign, allowing for maximized flexibility. Programmatic+ is also included with JobTarget 360.
In the Programmatic+ Dashboard, you can:
- Post & Stop your jobs
- Review Analytics and Reporting
- View current and past campaign cycles
- Manage your Programmatic+ Budget
Programmatic+ Video Walkthrough
💡For more video resources, check out Jobtarget Academy!
Accessing the Programmatic+ Dashboard

You can access the Programmatic+ Dashboard in one of three ways:
- Click 'Programmatic+' in the JobTarget dashboard.
- Click 'Programmatic+' in the top navigation bar.
- If JobTarget is integrated with your ATS/HRIS, you may need to click the menu button in the upper right-hand corner, then click 'Programmatic+.'
How to Use Programmatic+
- Posting and Stopping Jobs
- Reviewing Analytics & Reporting
- Managing Your Budget
- Setting Spend Targets
Posting and Stopping Jobs in your Programmatic Campaign

📣 Interested in having your jobs distributed to your Programmatic campaign automatically? Ask your relationship manager about an AutoPoster!
- Open your Programmatic+ Dashboard
- Scroll down to'Jobs With Activity This Cycle'.

- Switch to the 'Available Jobs With No Activity' tab if the job you would like to post has not yet been advertised in the current cycle.
- Locate the job you would like to manage.

-
- You can search by keyword or sort the 'Title' or 'Location' columns alphabetically for easier browsing.
- To advertise a currently unposted job, click 'Post Job.'

- Note: After clicking 'post job,' it can take 24-48 hours for your Programmatic posting to go live on all sites.
- To stop a currently active or paused job, click 'Stop Job.'

- Note: After clicking 'Stop Job, ' it can take up to 72 hours for your posting to come down on all sites. Additional traffic may occur during this period.
Reviewing Analytics and Reporting
- Filters
![]() At the top of the Programmatic Dashboard, you can filter your analytics and reporting by cycle, date range, and, if applicable, campaign.
At the top of the Programmatic Dashboard, you can filter your analytics and reporting by cycle, date range, and, if applicable, campaign.
| Campaign | The campaign field, which is visible if multiple campaigns are present on your account, allows you to select which campaign you want to view and manage. |
| Cycle | Each campaign runs on a 30-day cycle. You can view the current and past cycles' performance in the drop-down menu. |
| Date Range | If you would like to see performance within a specific date range, please select the calendar start dates and the end dates. |
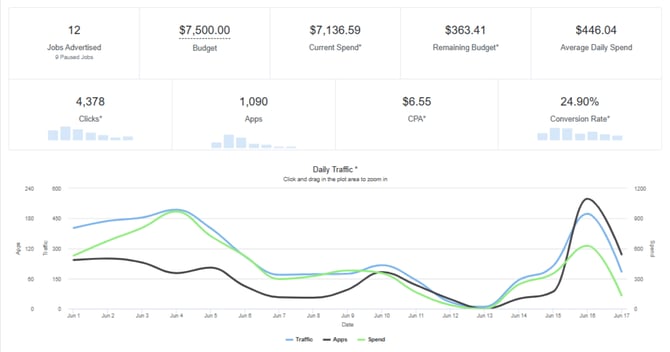
- Overall Metrics

| Jobs Advertised |
|
| Budget |
|
| Current Spend |
|
| Remaining Budget |
|
| Clicks |
|
| Apps |
|
| CPA |
|
| Conversion Rate |
|
- Daily Traffic

The Daily Traffic Graph shows the total spend, applications, and traffic for each day of the cycle(s) selected. Hovering over a specific date column on the graph will generate a popup outlining the detailed numbers for that date.
- Active Jobs

| Title |
|
| Location |
|
| Spend |
|
| Spend Target |
|
| Clicks |
|
| Apps |
|
| CPA |
|
| Posting Status |
|
| Action |
|
Managing Your Budget
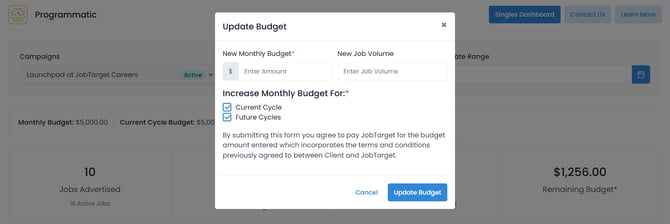
We know priorities and plans change. We provide options to manage your Programmatic+ budgets so your campaign is always firing at peak performance.
You can easily add a temporary budget for the current cycle, or update your monthly budget for future cycles.
- Open your Programmatic+ Dashboard.
- Click 'Add Budget' under the 'budget' display of the dashboard.

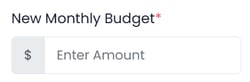
- Enter the new monthly budget you would like to set for your campaign.
- Enter the estimated monthly job volume.

- Choose whether this new monthly budget will apply to the current cycle, future cycles, or both.

- Current Cycle... If selected, the new monthly budget will be immediately applied to the currently active cycle.
- Future Cycles... If selected, the new monthly budget will continue to all future cycles.
- Click 'Update Budget'.
📣 Need assistance managing your Programmatic+ budget? Contact your Relationship Manager for additional guidance and a personalized strategy to help get your jobs the best exposure and reach the most qualified candidates.
Setting Spend Targets
A spend target is a soft cap that can be placed on a job. It tells Programmatic to stop a job if/when the spend target is met or exceeded. When the spend target is reached the job will be paused.
⚠️ NOTE: After a job is paused, it can take up to 48 hours to come down from all job sites. Additional spend may occur during that period.
To set or modify a spend target...
- Open the Programmatic+ Dashboard.
- Scroll down to your 'Jobs With Activity This Cycle' tab.

- Locate the job you would like to place a spend target on.
- In the Spend Target column, click 'No Target', or click on the existing value.

- Enter the target amount that you would like to set.

- Choose whether this new spend target will apply to the current cycle only, or the current and future cycles.
- Current Cycle Only... If selected, the new spend target will apply only during the current cycle, and will be reverted once the cycle ends.
- Current and Future Cycles... If selected, the new spend target will be set by on all future cycles.

- click 'Submit.'